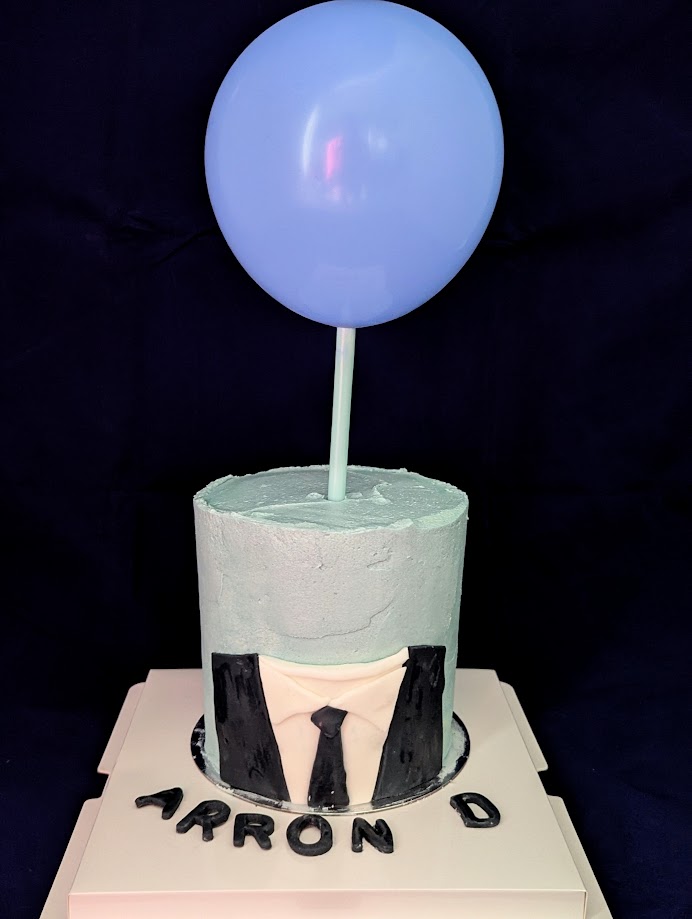
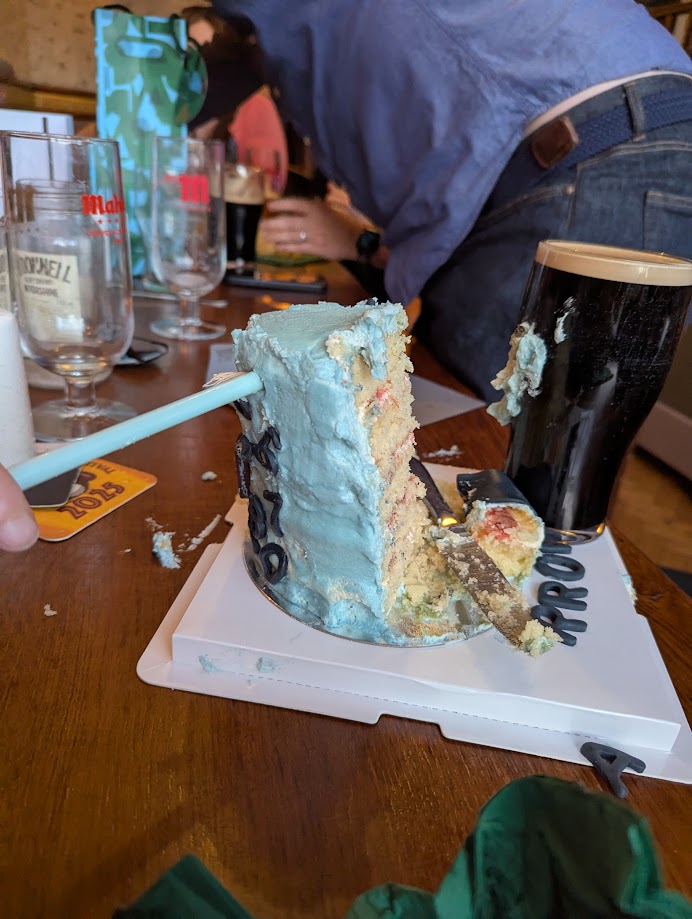
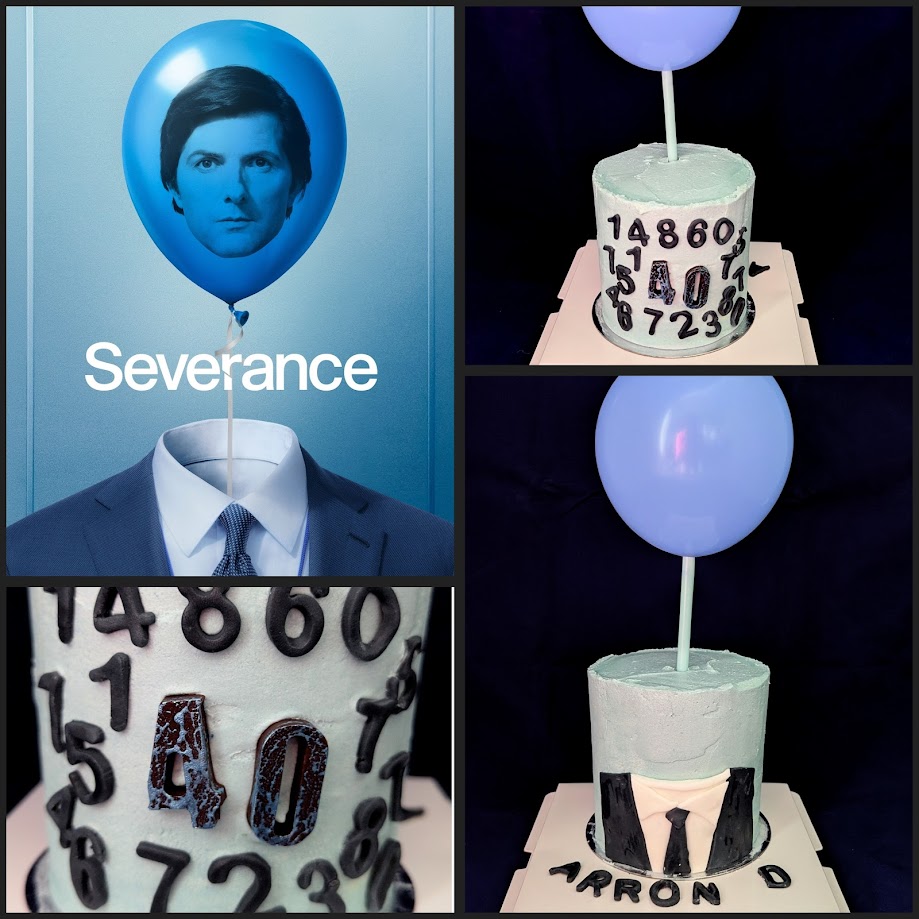
My friend is 40 today. He’s the penultimate person in our quiz-friend group to turn 40, with me being the last one next month. We all have a love for the TV show, Severance, so I decided to make a cake for his birthday based on this.
I usually lack my own ideas and look to the internet for inspiration… but there were so few out there! I had to use my own imagination.
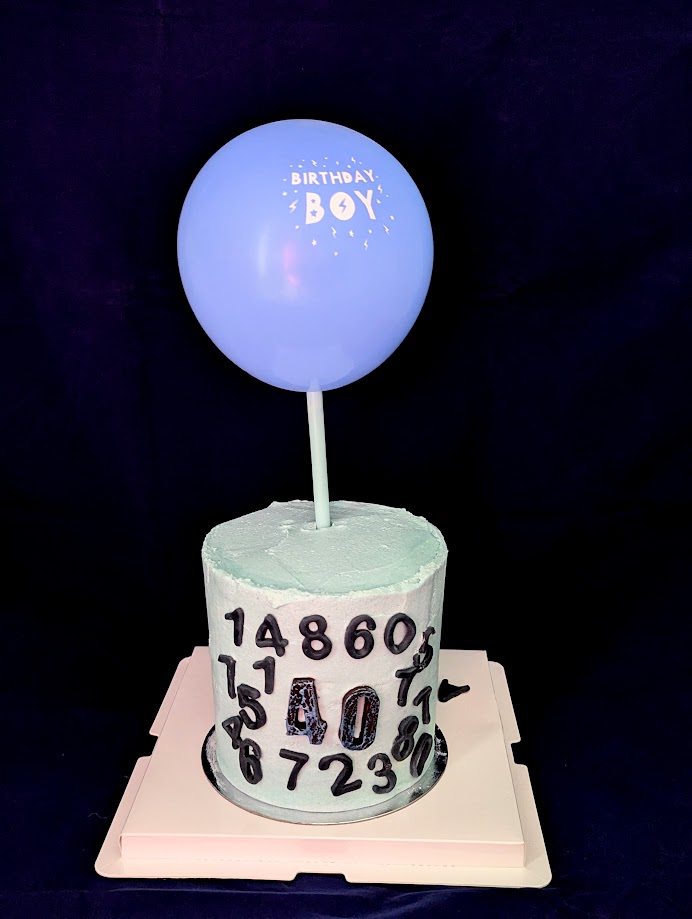
The front of the cake / balloon was based on a TV poster for season 2:
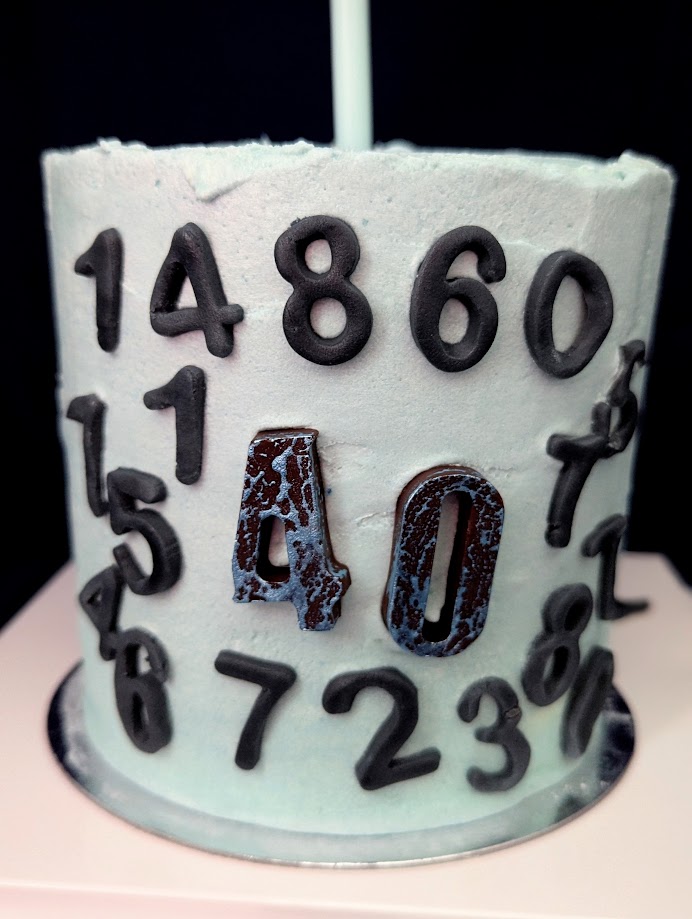
I then went for the “numbers” for the rear of the cake.
The cake itself was verrrrrryyyyy soft. I ussed plant butter for the buttercream (just as it’s so much cheaper than butter) but I added some liquid to it like I do with usual buttercream and this led to a very soft consistency. It held shape, but it did not hold up to being sliced with a butter knife at the pub. At least it tasted AMAZING!
One of my work colleagues reached out to me to ask if I could make a retirement cake for her husband who had retired from Royal Mail after working there for 47 years! I agreed to give it a go.
I started by originally coming up with the below, very poor, mock-up of a cake based on various other cakes I’d found online.
We agreed with the “usual” cake – vanilla sponge, strawberry jam, and vanilla buttercream. The toppers could be whatever I fancied so I went with cartoony postman (one from when he started and one from retiring) and decorations made from fondant.
To go with the main cake, there was also 48 cupcakes. Again, I was told to go with whatever flavours I fancied so we did:
12 x Chocolate 12 x Vanilla 12 x Cookies & Cream 12 x Lemon
The cupcakes were all made with a vegan recipe too so that most people could enjoy cake:
The cakes were topped with flavoured buttercream (made with plant butter) and both edible and non-edible decorations.
I got the post-themed ones from e-bay as they were printed on edible icing paper.
To avoid the toppers from wilting, I made fondant discs to sit between the toppers and the buttercream, and added the toppers just before delivery to keep them as fresh as possible.
Here’s some shots of the fondant decorations “drying out” before being added to the cake.
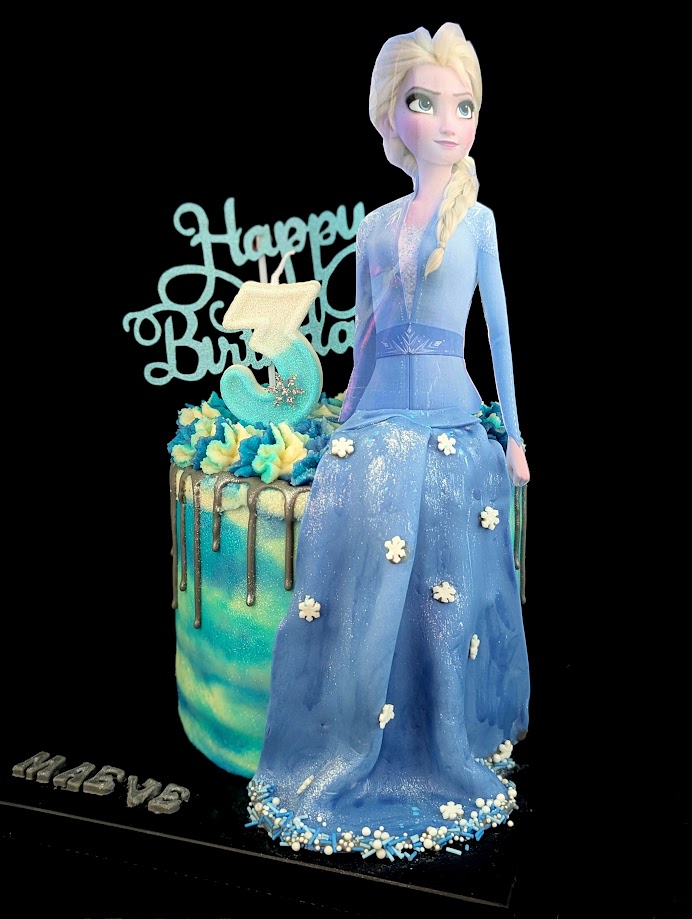
I got asked to make a Frozen themed cake for a third birthday. I actually made one of these a few years back for my volunteer baking, so I used the same design this time around for the birthday request.
I tried to be crafty and cut the top half of Else out of a gift bag and attached to some kebab skewers with glue dots. I then coloured some fondant to match the dress and added that as the skirt. Added glitter and sprinkles as the finishing touches.
For comparison, here is the side by side of the one from a few years back with the one I made this week:
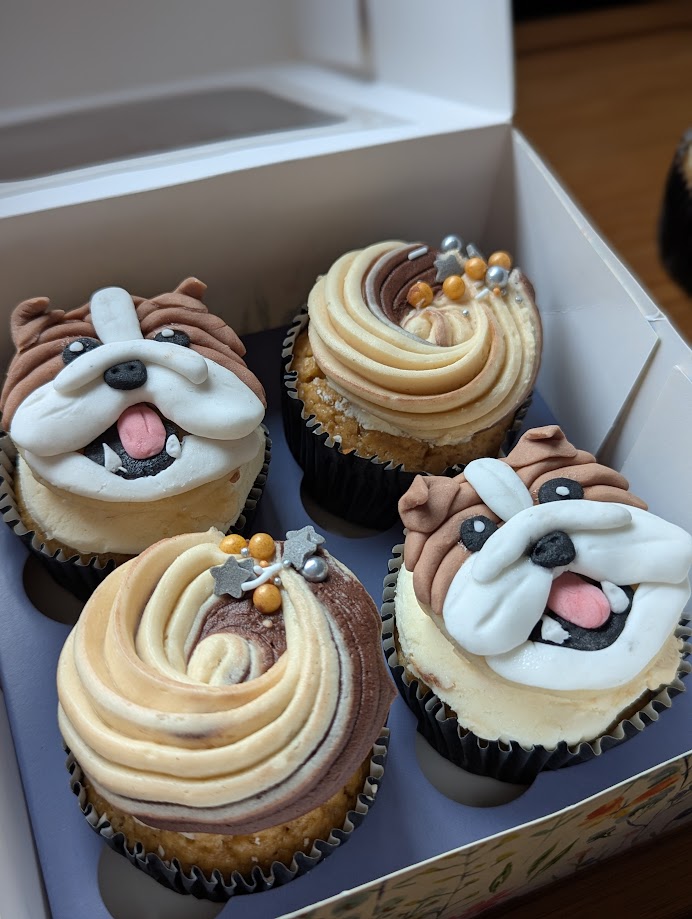
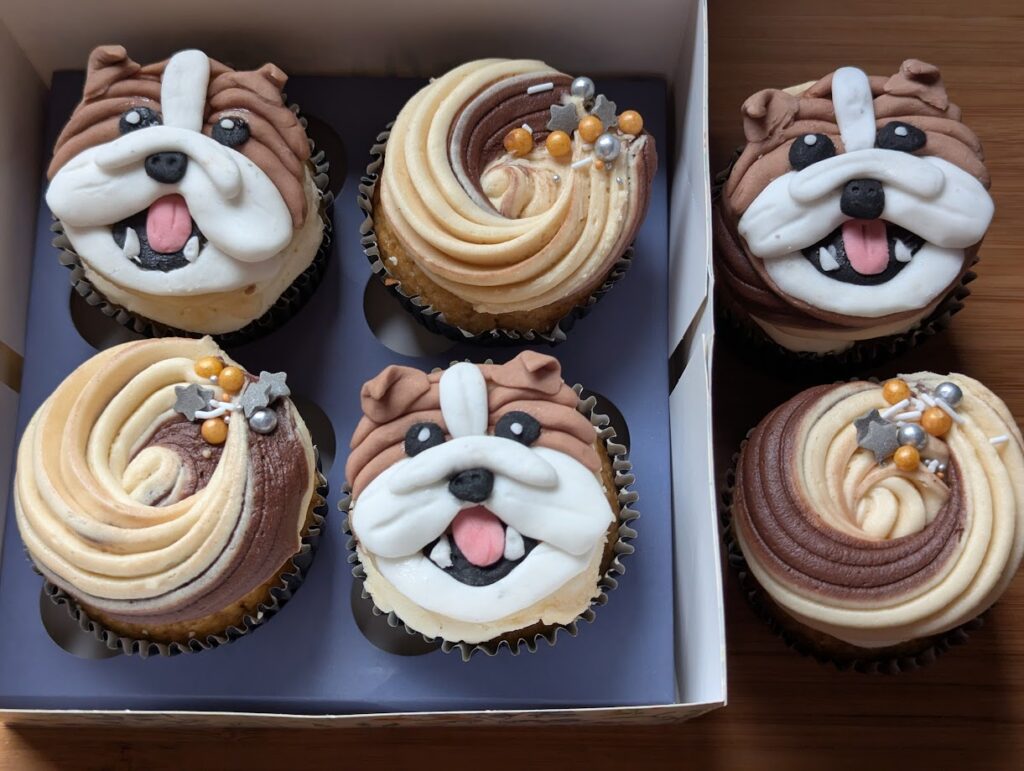
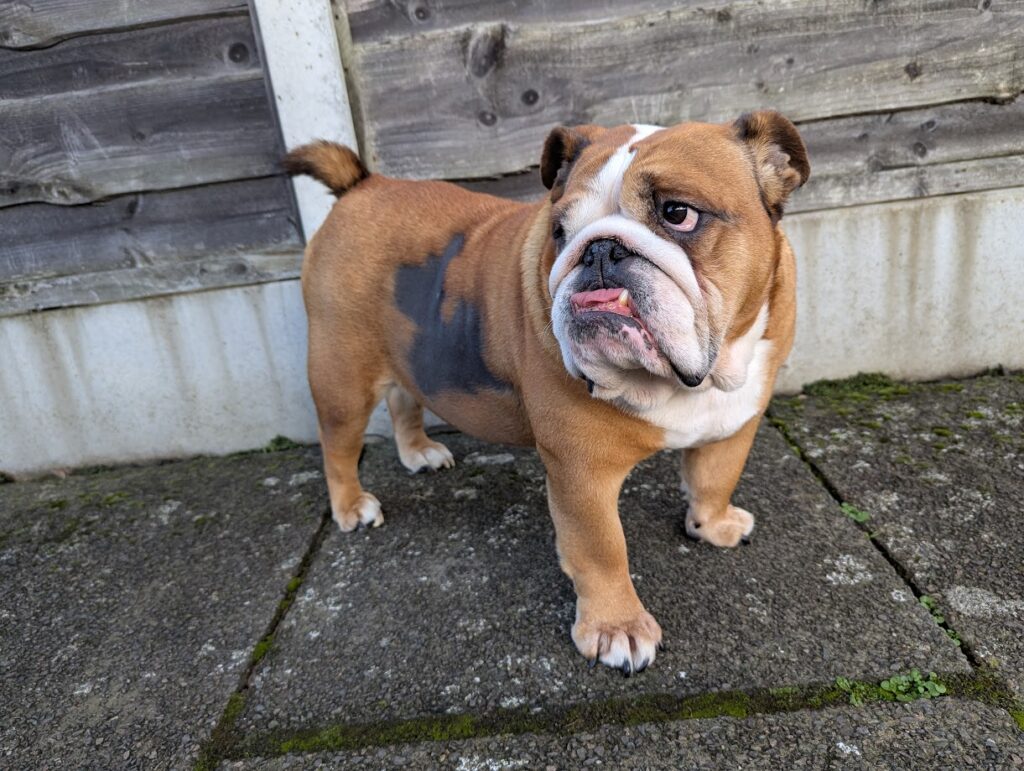
I look after a Bulldog called Betty from time to time after a few years back when she came to stay with us for a few months. Her owner is 50 this week, and went to Liverpool to celebrate at the weekend so Betty came to stay with us.
I wanted to treat her owner, so I got a few bits & pieces and then decided to make some cupcakes with Bulldogs on! This is Betty who I used for the inspiration…
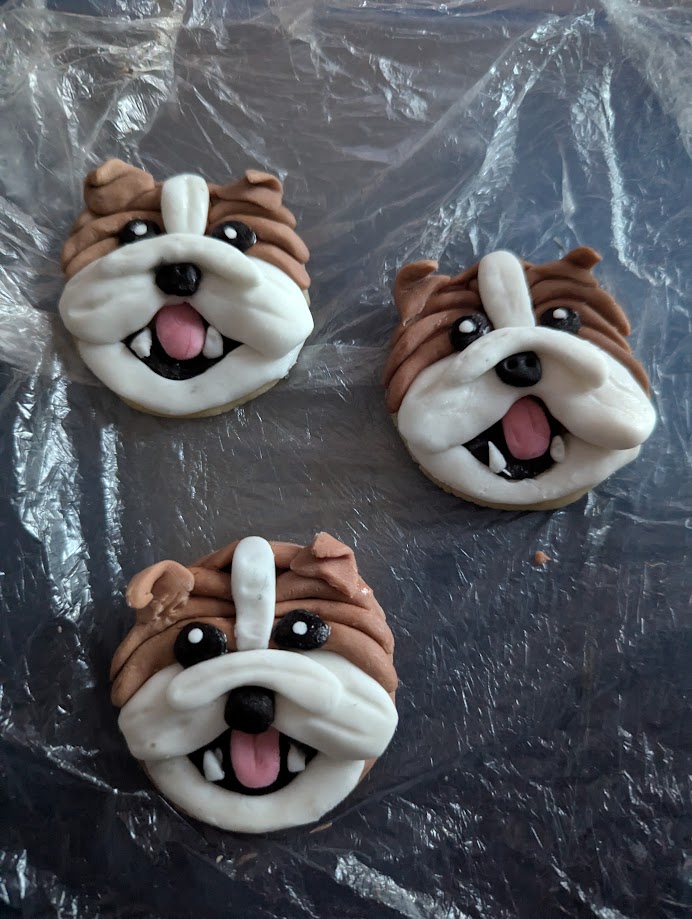
Betty was actually sat on the sofa next to me whilst I used a tray and fondant to make the toppers. I basically used various colours of fondant to make these bulldog faces:
I made 3 but only used 2 in the box of cakes that I gave to the recipient. The spare one has topped a cupcake that is back in the freezer to pass on to my parents too!
The actual cupcakes are made with a Caramelised Biscuit liquer (like Biscoff) which was also used in the buttercream topping. I added some cocoa powder ass well to give a chocolatey swirl, and finished with some sprinkles.
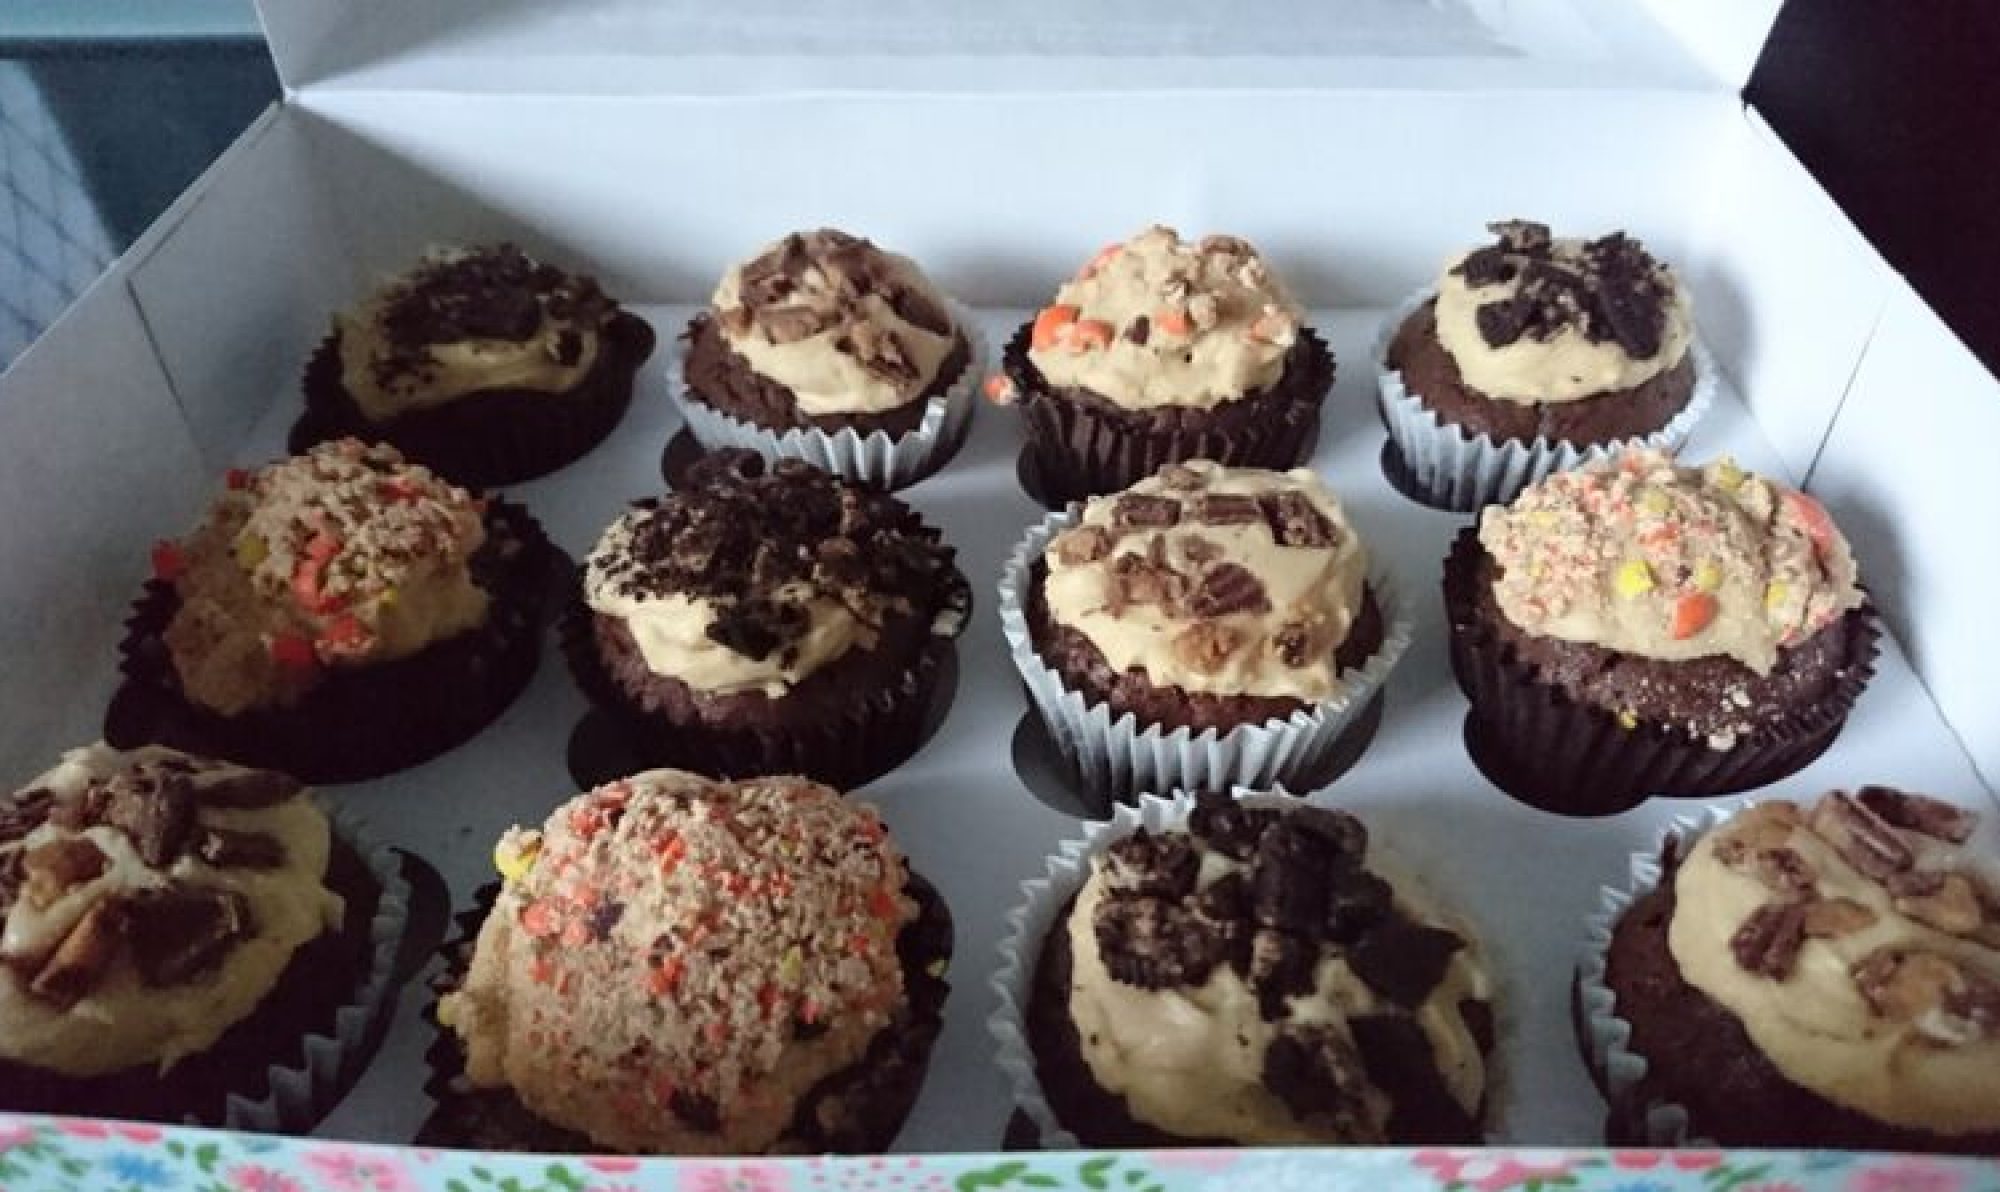
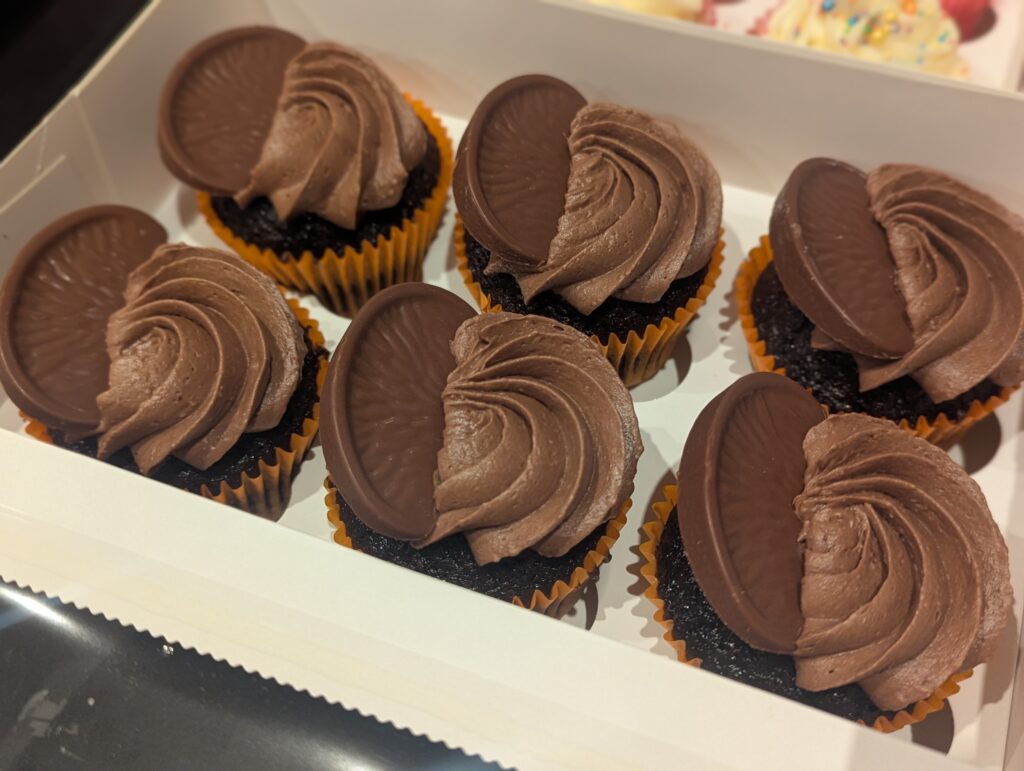
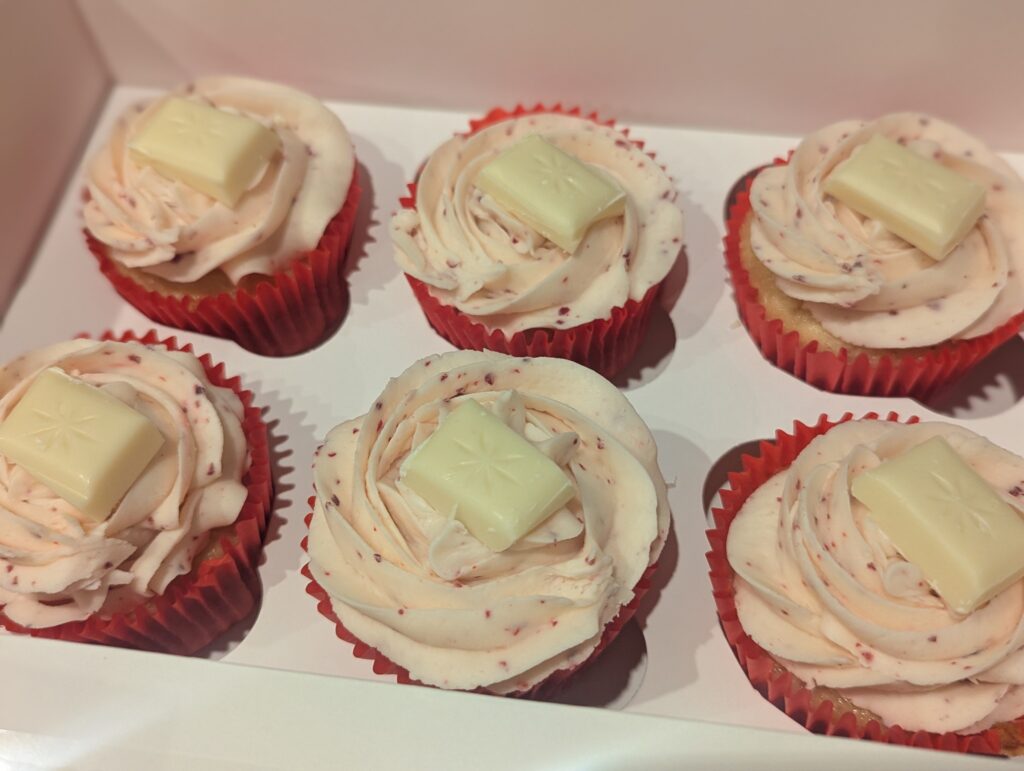
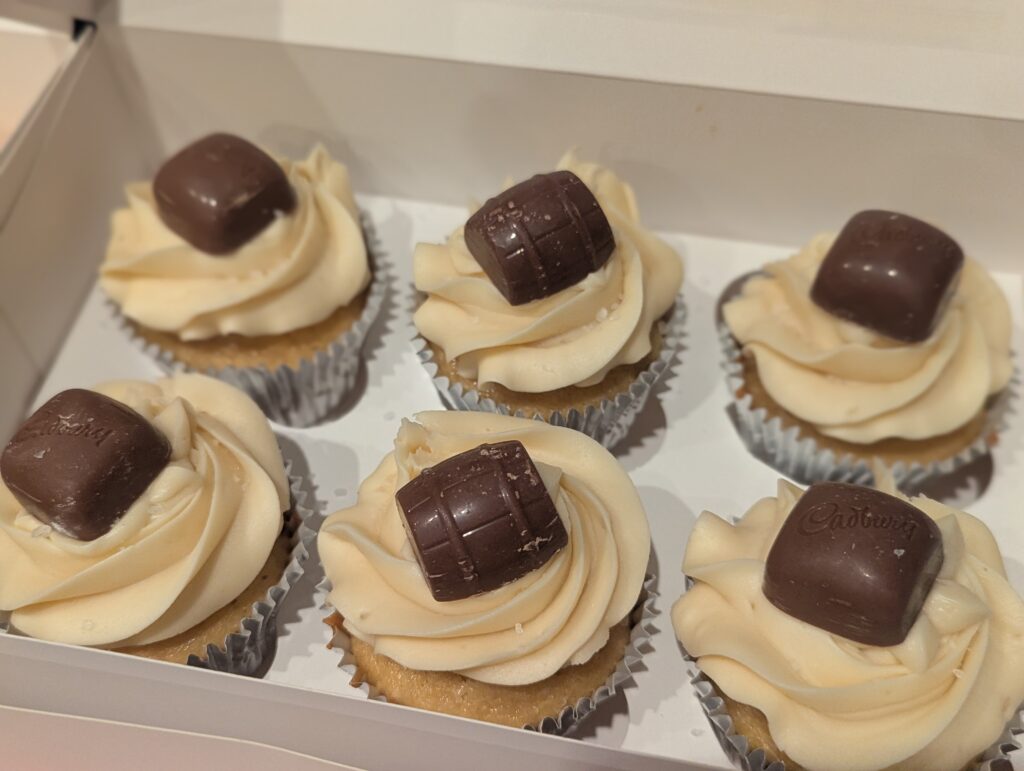
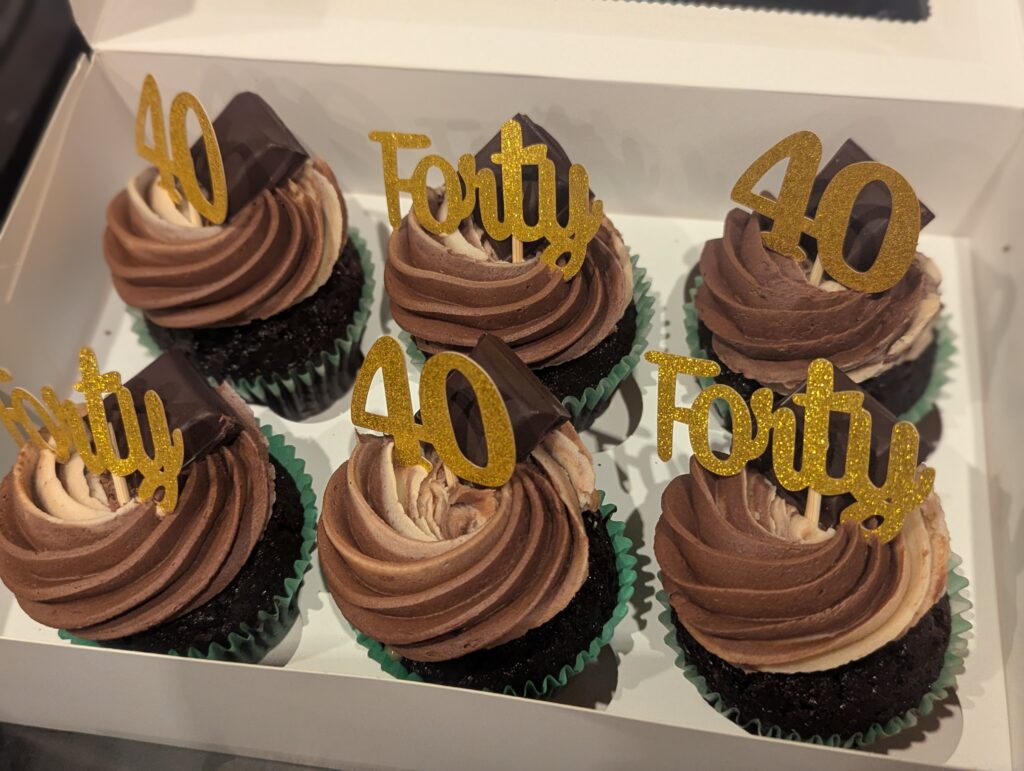
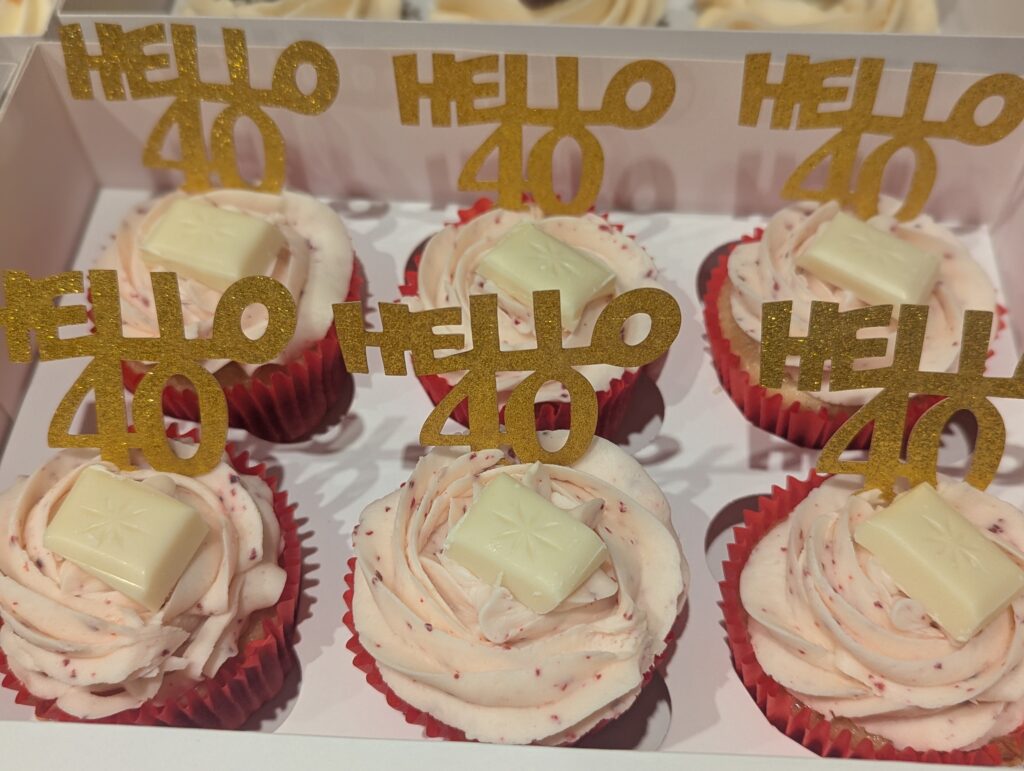
My sister in law is 40 this week, and my husband asked me to make 40 cupcakes for her. I bake in multiples of 6 and only had boxes that hold 6 or 12, so she’s getting 42 instead. It is the answer to life, the universe and everything, so I’m sure that the 42 is OK.
Anyway… The cakes
Mint chocolate:
Chocolate cake with a peppermint fondant filling. Topped with chocolate and mint swirled buttercream and a piece of mint chocolate bar.
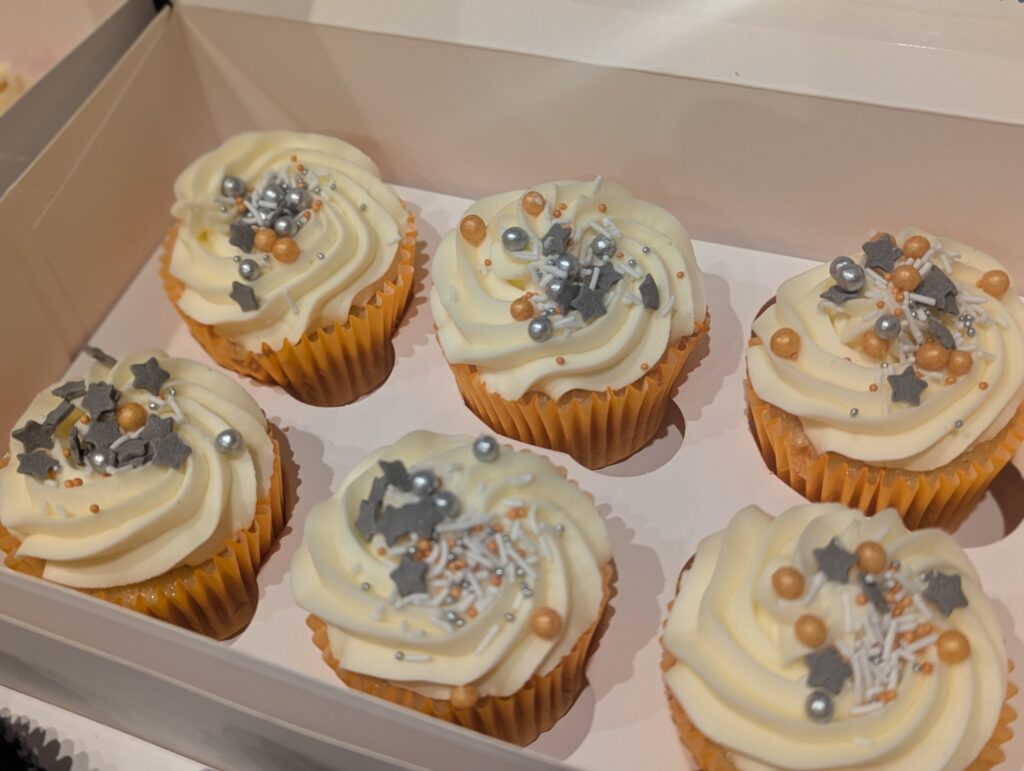
Vanilla:
Vanilla sponge topped with vanilla buttercream and sprinkles. A classic.
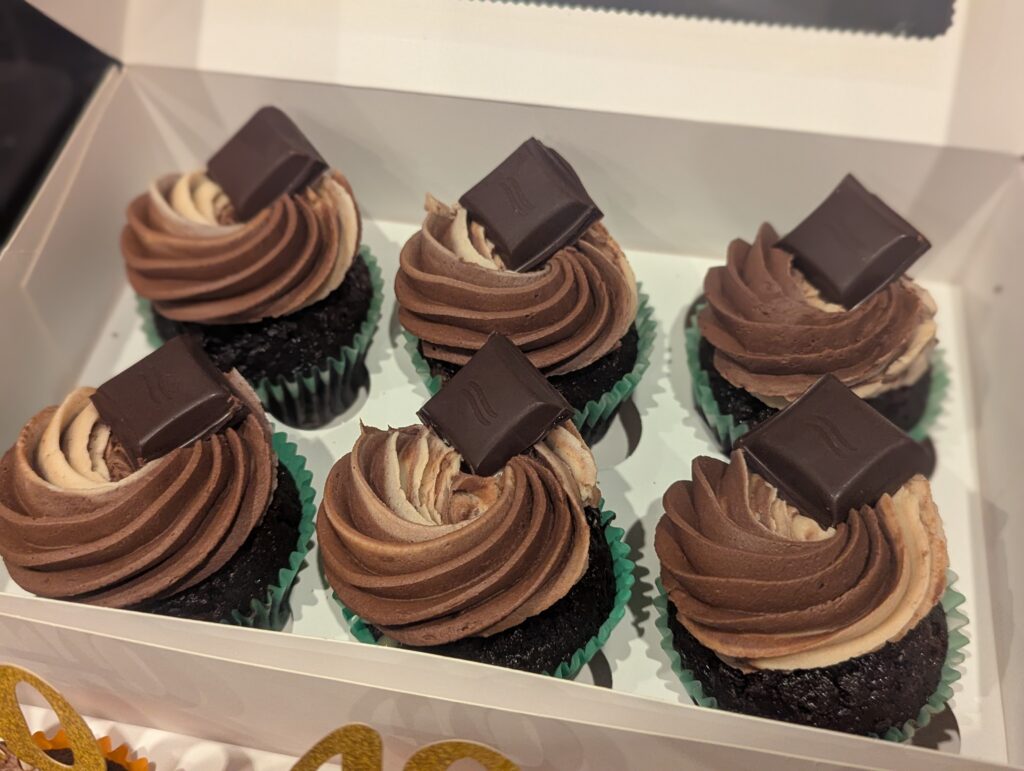
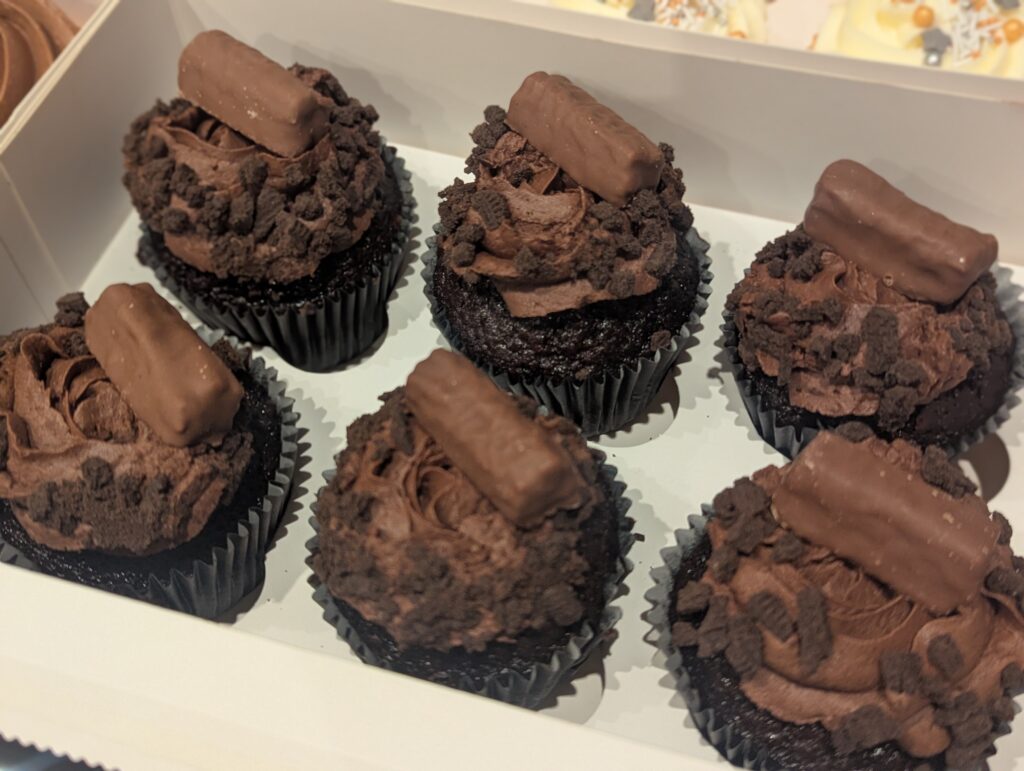
Mega chocolate:
Chocolate cake, topped with chocolate buttercream (made with additional melted dark chocolate mixed in). Finished with Oreo Crumbles and a Cadbury Twirl mini.
Lemon:
Another simple, yet effective flavour. Lemon sponge, topped with lemon buttercream and sprinkles.
Chocolate Orange:
Chocolate sponge that was flavoured with Orange essence. Topped with orance chocolate buttercream, and a Terry’s Chocolate Orange segment.
White Chocolate Cherry:
Sponge cake flavoured with cherry essence and white chocolate chips baked in. Topped with cherry buttercream and a white chocolate chunk.
Salted Caramel:
Salted caramel flavoured sponge topped with salted caramel buttercream and a sprinkle of sea-salt. Fainal touch are Cadbury caramel chocolates / Quality Street caramel barrel.
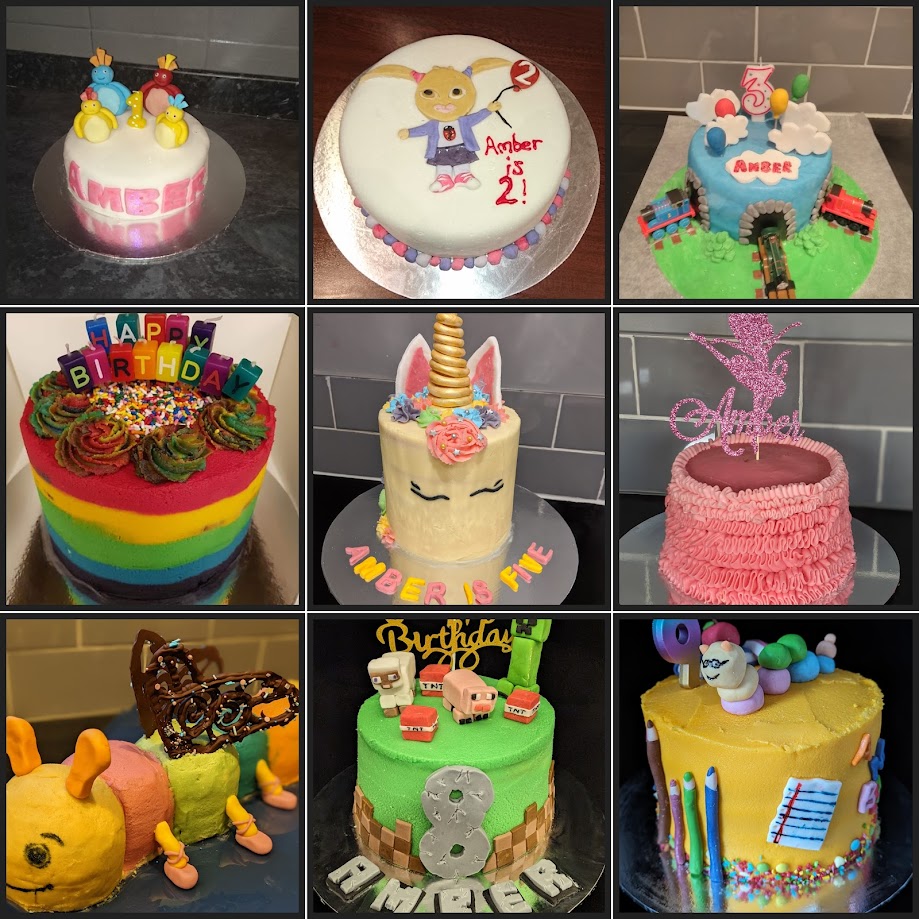
Amber is my eldest niece, and I’ve made her birthday cakes every year since she was born. Usually, I make a cake based on her request and over the years this has included:
Unicorn Cake
School Cake
Minecraft Cake
Rainbow Ballerina Fairy Caterpillar
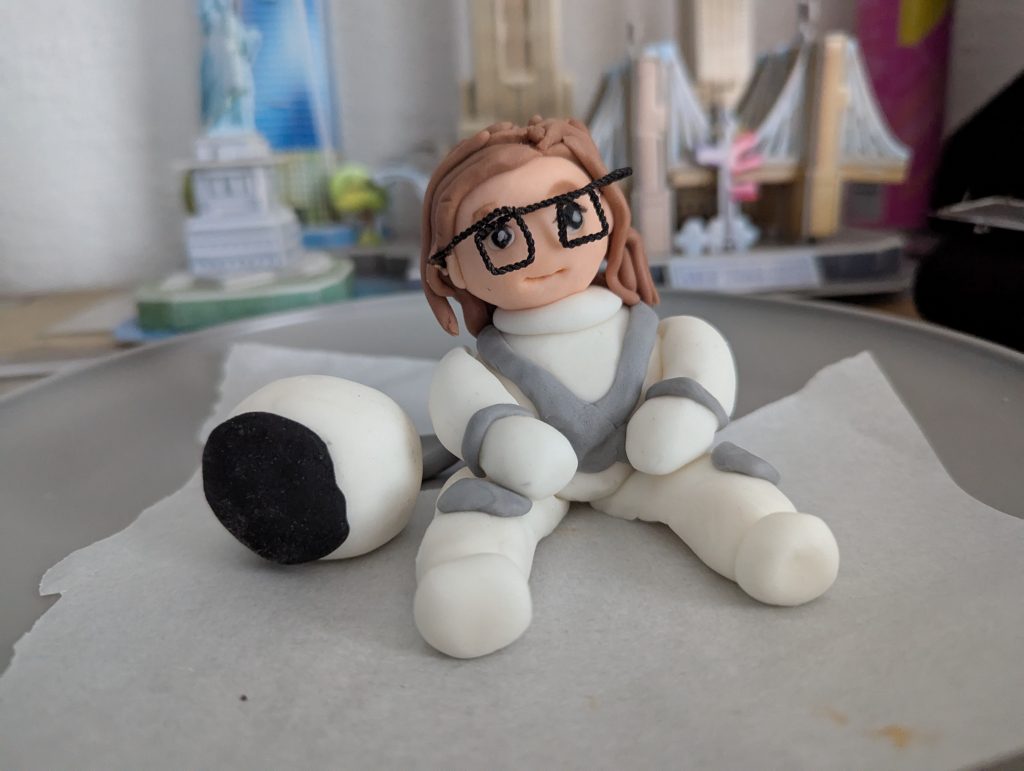
Her birthday falls quite soon after Christmas, and often the ideas come my way later on. This year, I asked if I could just run with my own idea and I was told to “have fun with it”. In school last year, Amber learnt about space and has been really interested in it ever since. She was jealous that we went to visit NASA in Houston on our trip last year, so I knew that I wanted to make her a “space” themed cake.
I made a fondant cake topper astronaut with its helmet off, so that I could try model a character of Amber to sit on the cake. The glasses were the hardest part for me – I couldn’t make them out of icing (too fiddly) so I ended up stripping a pipe-cleaner instead.
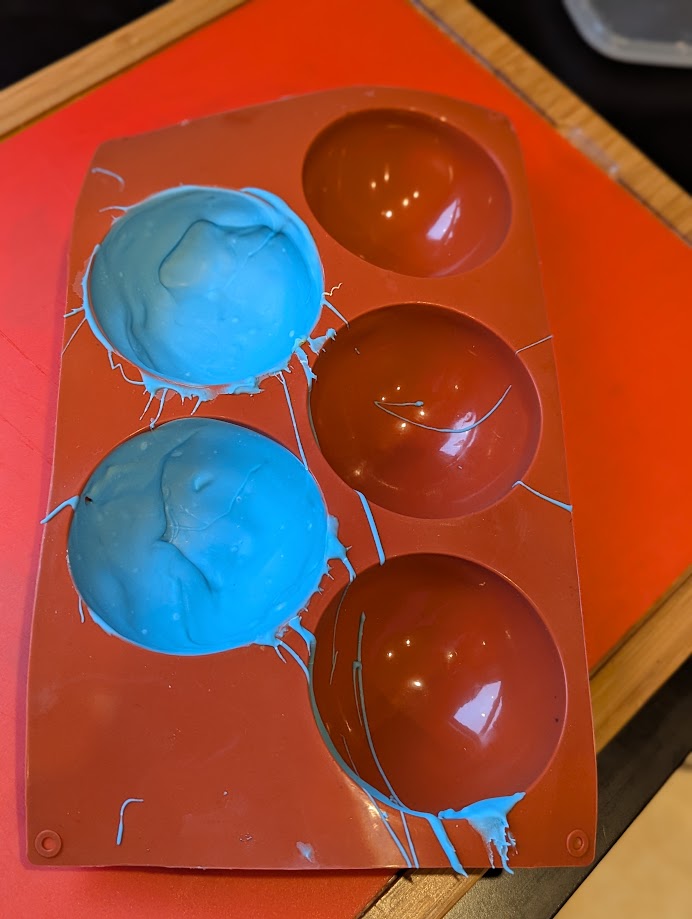
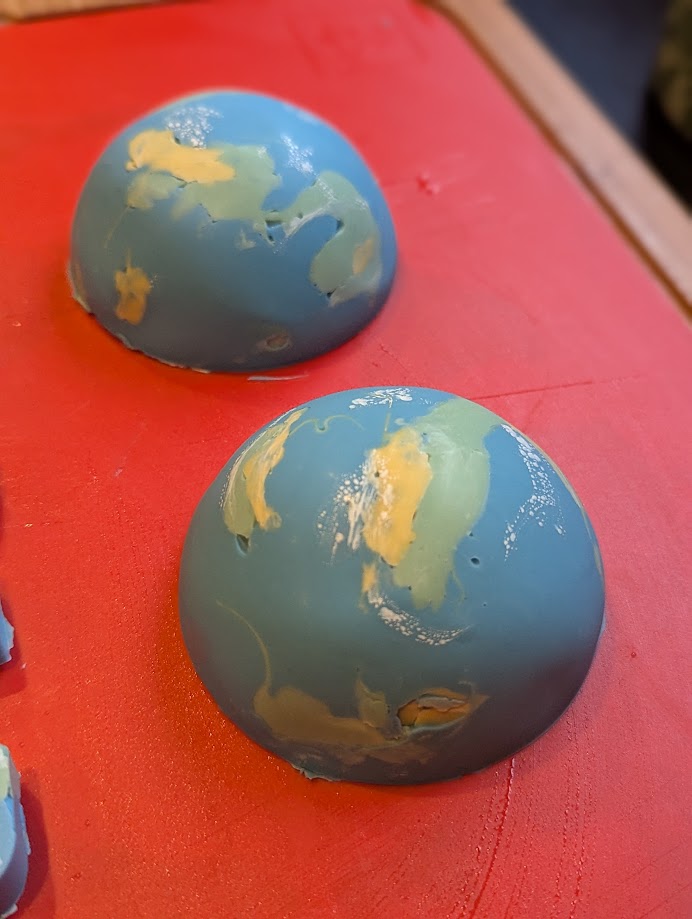
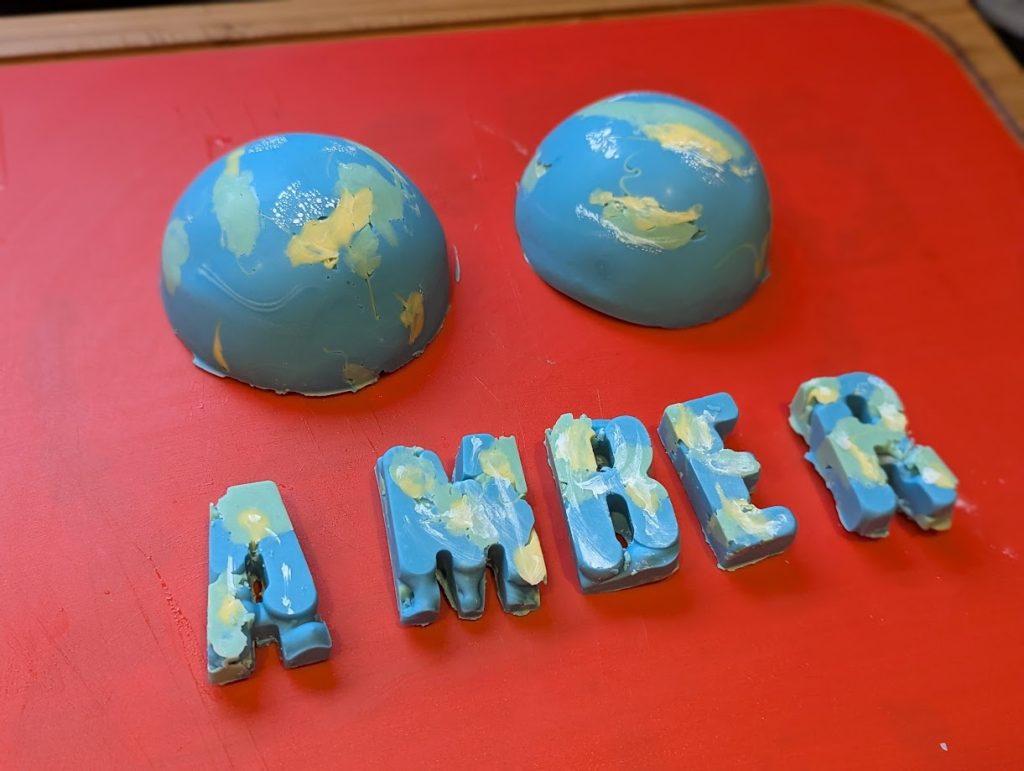
The planet on the top of the cake was made using a round silicon mold that a workmate gave me in December as they weren’t going to use them… never has something come to me so perfectly timed.
I was scared that they’d snap when trying to remove them from the mold, but they came out intact – hooray!
I tried to make the letters for “AMBER” in the same planet design, but the chocolate didn’t quite fill the molds. I still used them though – never waste food!
The cake was a “standard” birthday cake: Vanilla cake, strawberry jam & vanilla buttercream. I iced the cake by hand (didn’t use my cake coating kits for ths one) and used a scraper to achieve the colouring on the outside of the cake. I used a base of light-pink coloured buttercream and them added purple, magenta and silver for the pink “galaxy” effect.
I used a paint brush to apply the silver star splatter, and used some fancy sprinkles that my friend got me for Christmas to add stars to the outside.
After adding the planet and the astronaut topper, I used some cake balls to add some additional planet design to the outside of the cake.
We presented the cake today, then cut some slices for people to enjoy – I was really happy with how this one turned out.
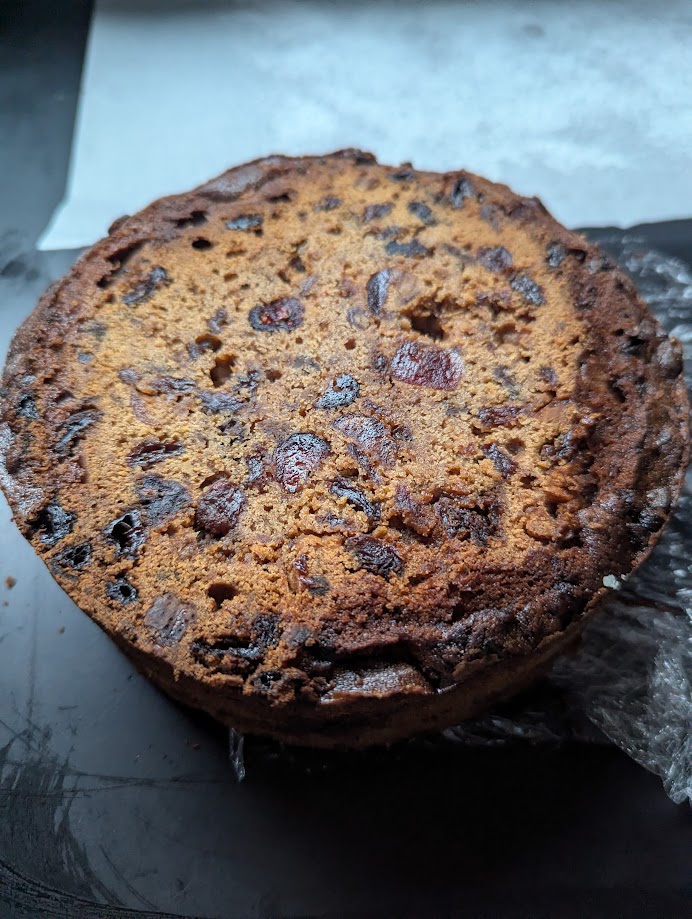
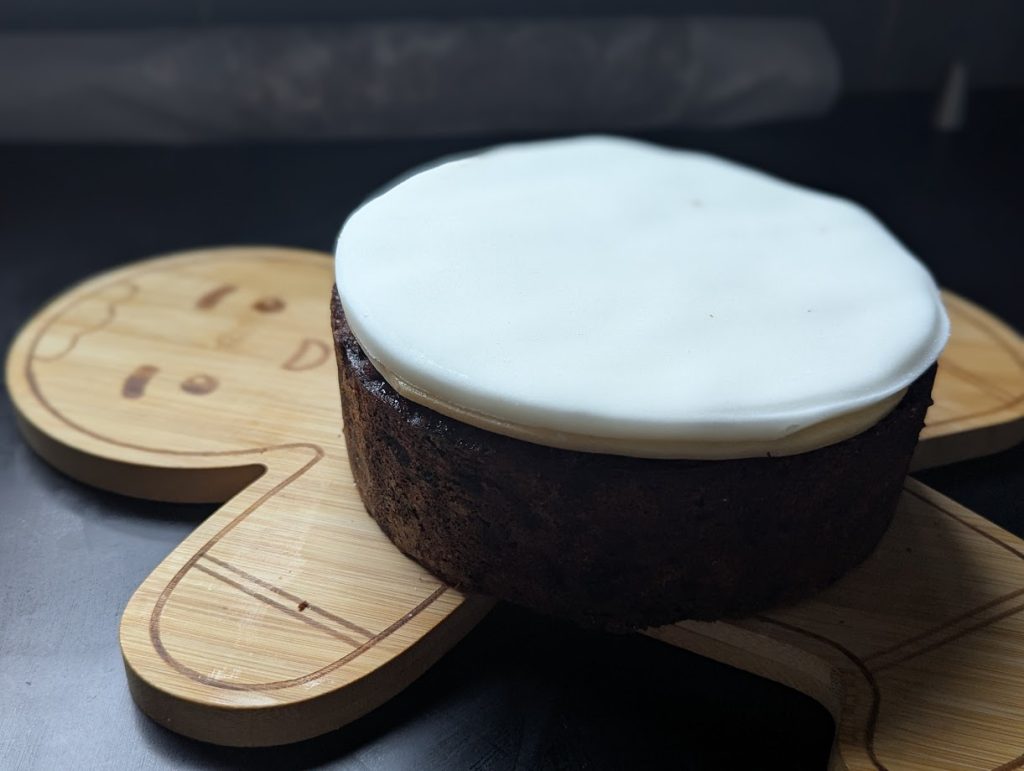
The first time I’ve made my own Christmas Cake… just because I felt like it! I LOVE fruit cake (not everyone does) and made this 8 inch cake in case anyone in my family fancied it this week.
So far, I’ve only tried some cake scraps when I trimmed the top of the cake to flatten it off (and they were goooooood):
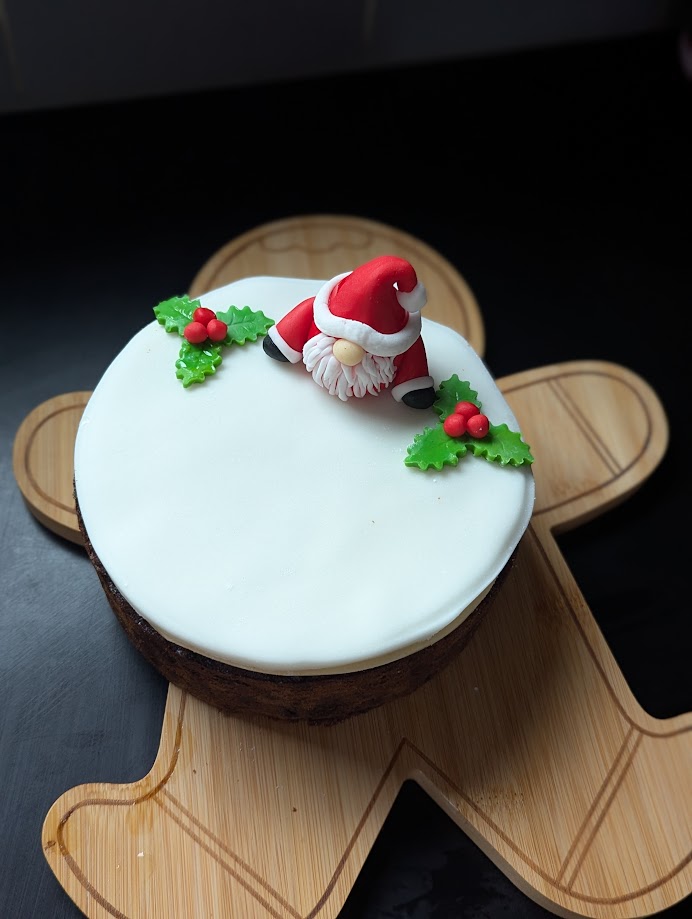
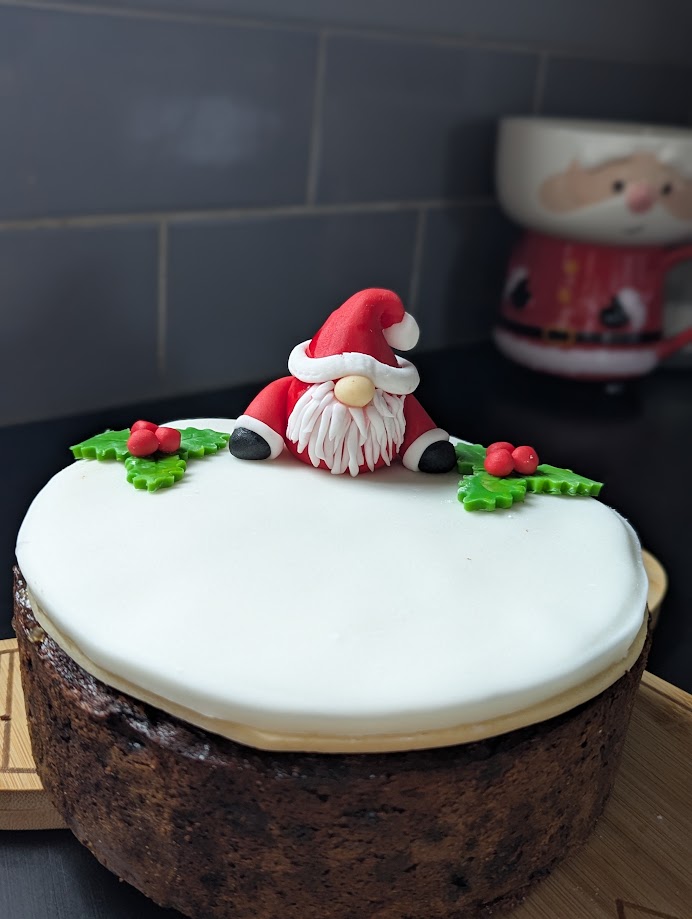
The cake is topped with marzipan and fondant icing (as is standard) but I used a ginger preserve to stick the marzipan to the top.
To finish the cake, I decided to make fondant gonk alongside holly and berries:
The gonk is a simple design but I like how effective it is.
I remembered this weekend how much I enjoy baking when I do it just for fun and not because I HAD to bake for someone.
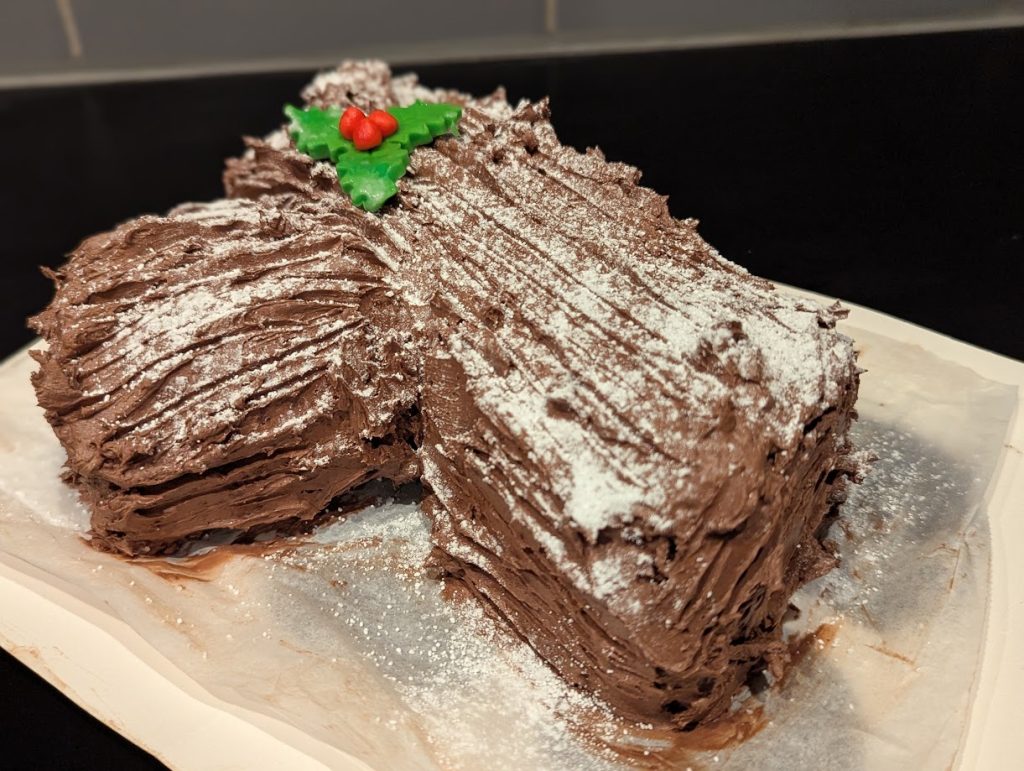
I decided to try making a yule log for the first time and had a look online. I found a recipe for a larger pan so I did 3/4 the amount as I had a smaller tray.
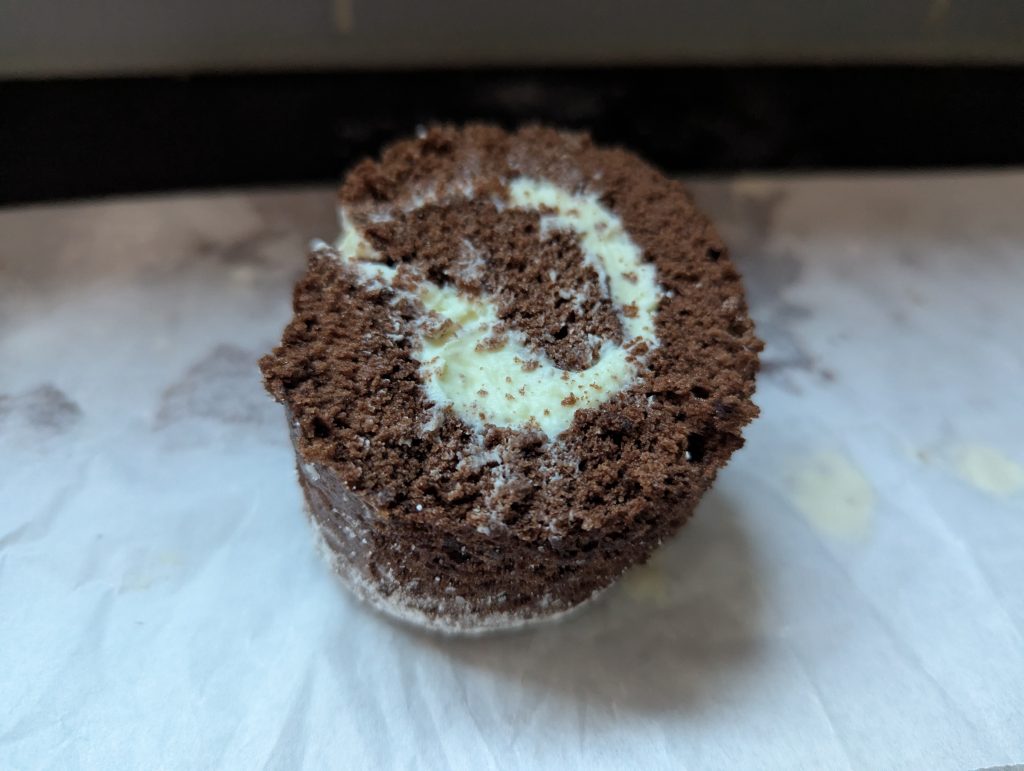
I made a whipped white chocolate cream ganache filling using 200g double cream and 200g white chocolate.
The recipe I followed said to roll the Yule log lengthways (longest side) but due to the thickness of my cake and filling it ended up looking like an arctic roll.
I coated the outside of the log with a dark chocolate ganache buttercream & found when I was finished that I had too much coating left. Being me, I decided to make another Yule log to use the excess filling and coating.
I made the second Yule log with less ingredients to make a thinner cake in the hope that it would be easier to roll. This time, I rolled from the thinner end to get more of a swirl
I used the leftover coating to cover the Yule log:
I assume it’s because I left the coating overnight, but the second Yule log looked far darker than the first even though it was the same mixture.
Overall, I was really happy with how these turned out. They look OK, and taste really good! Marry Christmas to me & my family!
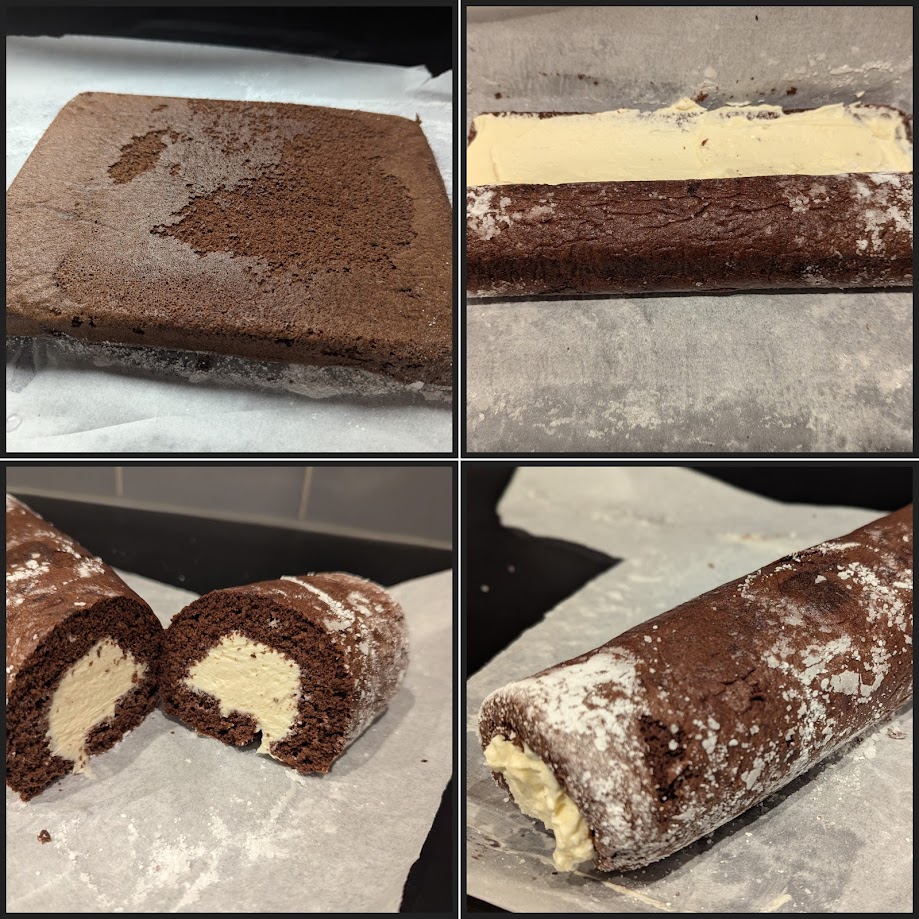
As you may have noticed from my last post, I’m not the quickest to jump on a trend bandwagon. I saw brownie yule logs all over Instagram last year (or maybe it was 2022?) but I finally wanted to give it a try this year.
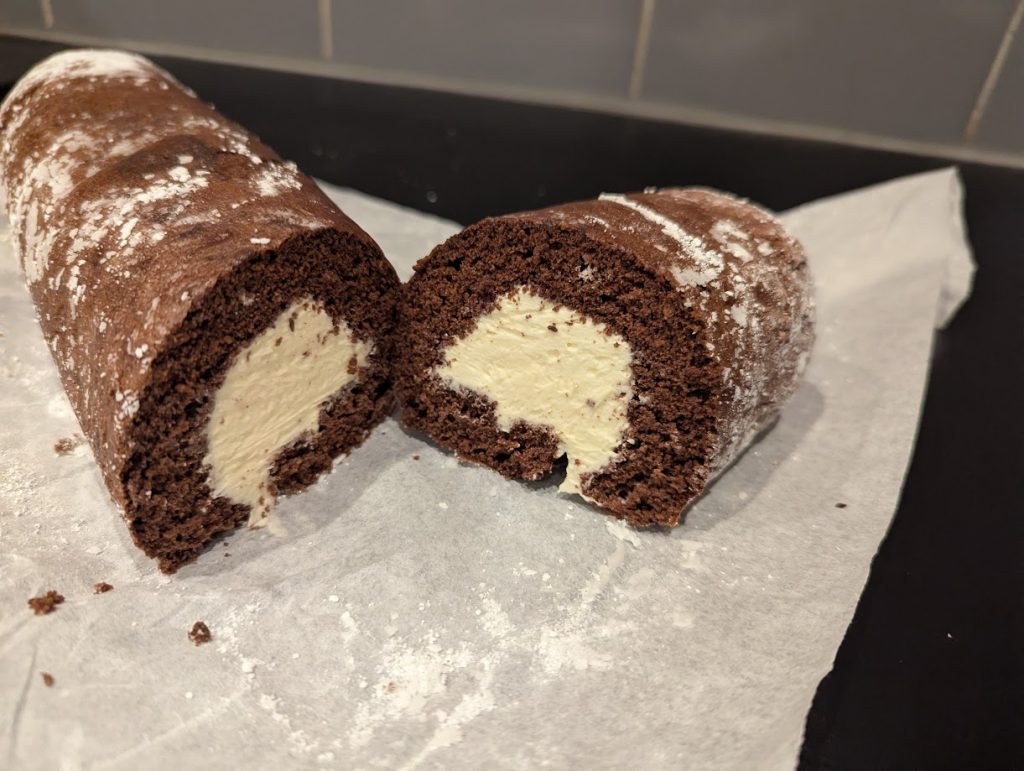
The first attempt I went with was the chocolate brownie Yule Log, that I filled with biscoff and milk chocolate. I followed the Finch Bakery recipe and instructions, and was amazed that things went well & the roll turned out brilliantly. Genuinely expected it to go far worse for my first attempt!
The above image shows some of the steps involved. – Baked the brownie and allowed it to cool fully, before mixing it in my stand mixer. – Lined my sheet tin with cling film, and pressed the brownie into it – Allowed that to set again, then added the filling – in this case a mixture of Biscoff and oreo crumbs. – I then rolled the log, using the clingfilm to help hold it in place.
I wrapped the log and allowed it to fully chill before coating with melted chocolate. I used milk chocolate for the outside of this one, and added some fondant toppers.
Feeling confident after attempt 1, I decided to try a Blondie Roll with PB filling. I used a different recipe to the one on the Finch Bakery sheet, which is a blondie I had successfully made before.
Things seemed OK at first, until it came time to roll the log, and the blondie just crumbled into a sand!
At first I thought about giving up on this one and using the crumbs for some truffles, but I saved it by adding more “wet” ingredients to the mixture to get it to a rollable consistency (basically oil & peanut butter!)
This time around, it went a lot better but was VERY THICK thanks to the extra ingredients. No-one would complain to that though!
I coated this log in blonde chocolate mixed with raspberry powder to give it more of a PB&J vibe.
Undetered from the issues with the PB roll, I decided to try a peppermint bark one. The brownie layer was fine, but my white chocolate ganache filling was too wet and I had to scrapre it off and re-do it before rolling. You couldn’t tell though – and this one was my favourite (taste wise):
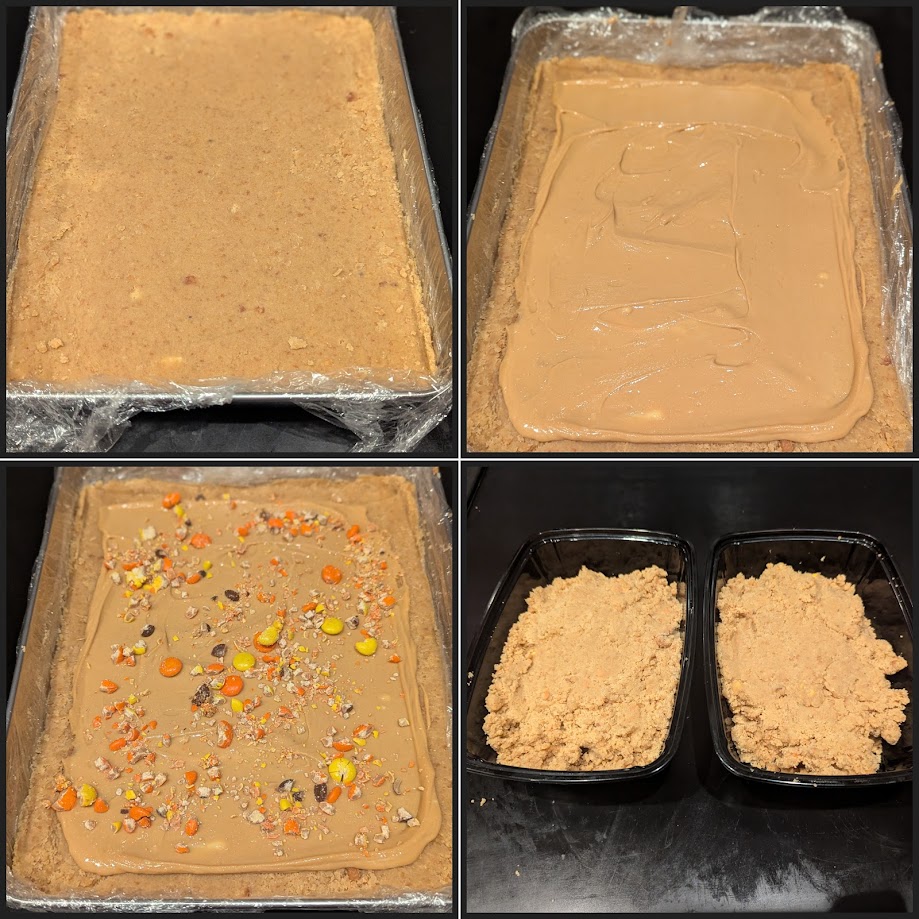
At the end of all this, I decided to try one more roll… this time feeling inspired by the cornflake rolls I have seen posted by Georges Bakery. My friend got me his “Rebel Bakes” book earlier this year for my birthday, so I decided to try making the caramel cornflake recipe to use in a roll.
Take 1: Making the caramel from scratch & I managed to burn the sugar. I binned it and tried again.
Take 2: This time, my sugar wouldn’t melt & I ended up having to bin that batch too.
Take 3: I decided to deviate from the Rebel Bakes book and instead try making a “wet” recipe. This went to pot too – the sugar was not browning and the mixture just looked like a wet fudge. Rather than waste even more ingredients, I ended up combining that with chocolate and marshmallows to form a decadent cornflake cake.
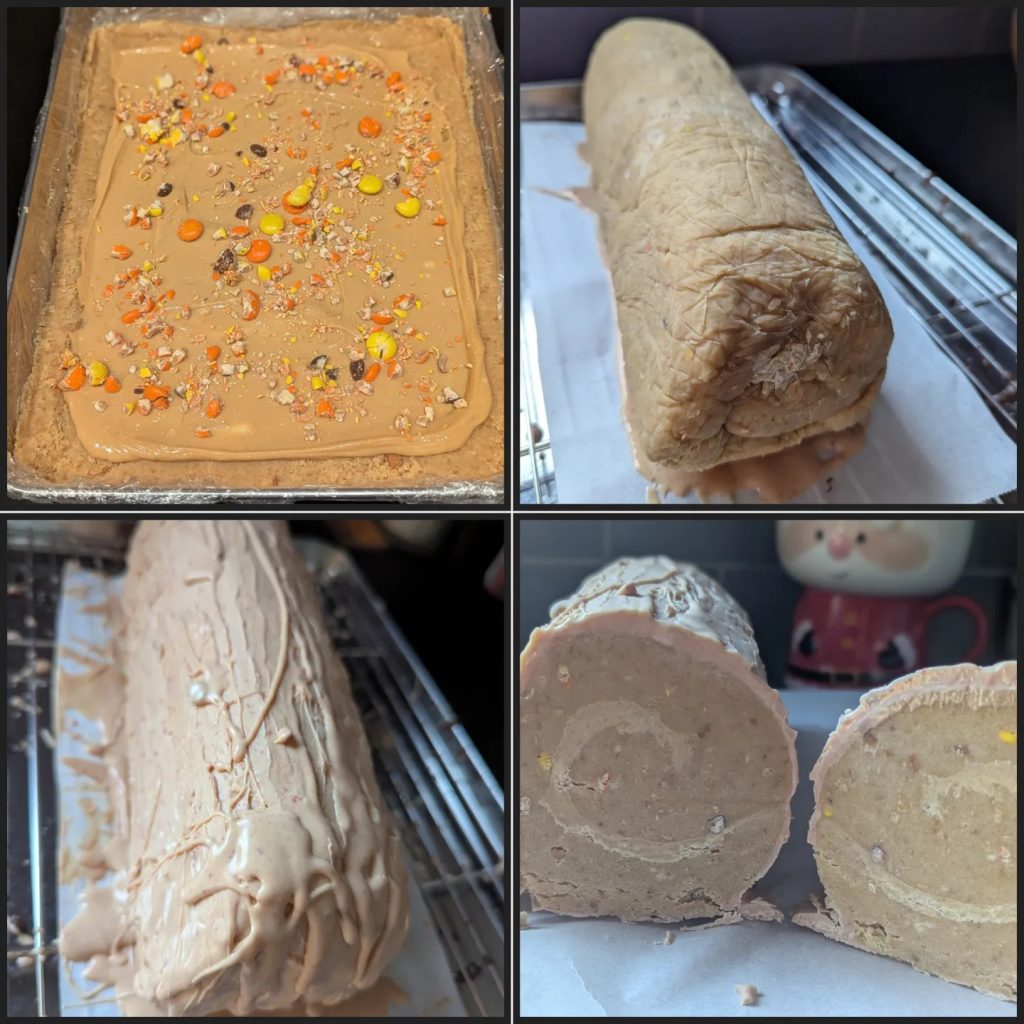
To add to my annoyance, I couldn’t get the cornflake mix to “roll” without breaking so I ended up just squeezing it into one big log & coating with a mix of white and dark chocolate.
In spite of this one annoying me the most, it was the best tasting cornflake roll – so at least that part went well!
I ended up slicing the logs last week. I boxed some up for friends (alongside the cookie pie slices) and then took the rest to work with me.
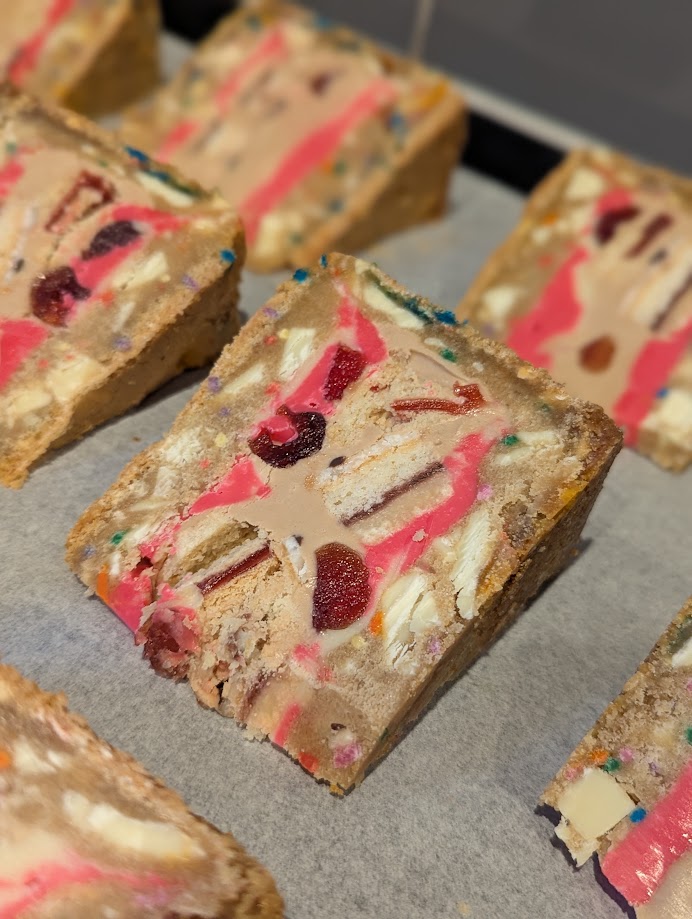
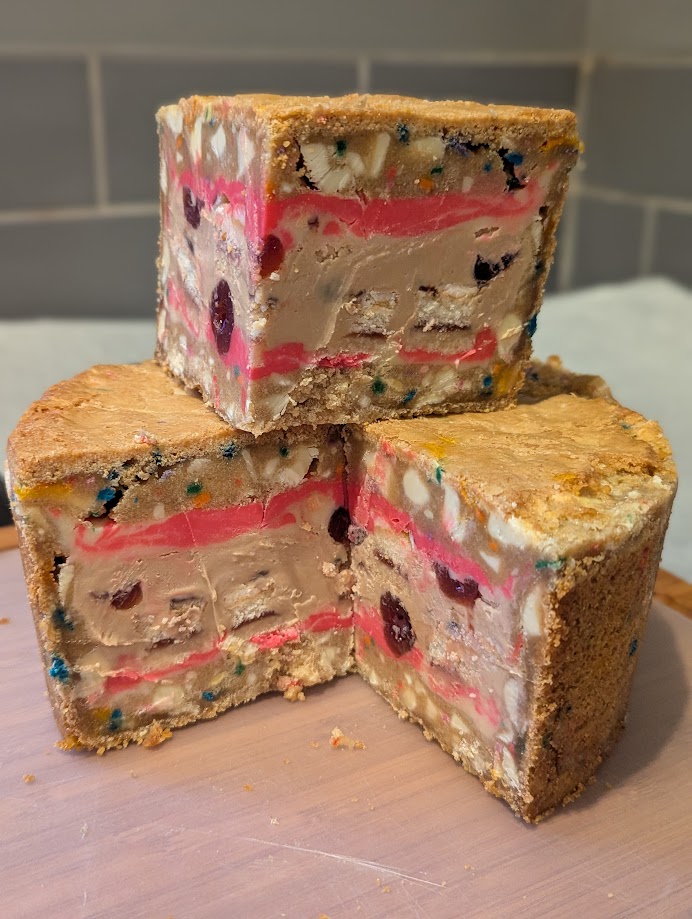
I’m behind trends, but I finally got around to making a Cookie Pie last weekend.
It started by making a cookie dough. I chose to make a white chocolate chunk & funfetti dough. You make the dough, then split into 3 separate portions. The first portion is used as the base of an 8″ pan, and the second portion is used to coat the sides of the pan:
I chose to fill my pie with a variety of things – the first being homemade white chocolate ganache. I coloured some of it pink (with an oil-based colouring) and added some cherry flavour to the pink ganache. I spooned some of this into the bottom of the pie:
Next up was adding some fillings. The picture shows bakewell slices, but I also added cherries, jammy dodger biscuits, and a hazelnut spread:
I added more ganache to finish the pie filling, then chilled it for an hour to allow the contents to set.
After chilling, I added the top of the cookie to the pie:
I froze the pie for another hour, then baked it for 30 minutes. I did have an accident in that the cookie lid overflowed, but I saved it & cut the excess off once it was out of the oven
In hindsight – I should have used a springform pan, as it took quite a bit of effort to release the pie from the loose-bottomed tin!
The next step was to cut the pie… and it was a BEAST!
I cut the pie into 12 portions, and gave most away to workmates and friends (I did eat one myself though – it was beautifully wrong!!